
These are a few examples of images in different format sizes related to digital video and digital video editing. Some notes also talk about how you should handle the different formats using Adobe Premiere 6.5. Please note that Adobe Premiere 6.5 is the first version of Premiere to correctly handle pixel aspect ratio (PAR). Version 6.0x had a few bugs.
Here is a hint to those working in Adobe Premiere. Your project settings should match your final output format and may not be what you clips are! If you are going to display on a 16:9 TV, use a 16:9 Widescreen project setting. Make sure all your clips have the correct pixel aspect ratio (change it if you need to). When you put the clips on the timeline, make sure "maintain pixel aspect" is turned on. Just remember that you may not want to output to a 16:9 display format if the majority of your content is 4:3 in size. You will end up with black bars on the left and right. Choose your final display format carefully and make your project match it!
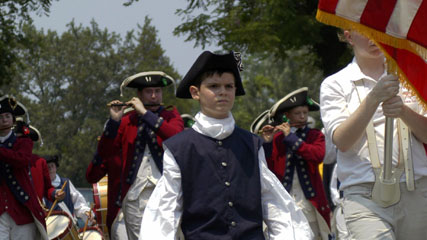
Lets start with a 16:9 image (a). When we say 16:9, we talk about the ratio of the size of the image (width to height). Because of the way digital formats for NTSC (and PAL for that matter) handle the content, your video file will look stretched when played on a device that does not correct for PAR. Image (a) could be any image that is 16:9 in size ratio (1600 pixels wide by 900 pixels tall is an easy example). All of the standard HDTV formats are square pixels which makes working with digital video on a computer MUCH easier, but for now, a bit more expensive!
|
| Image (a) - 16:9 display image. |
Image (a) will look this way on a 16:9 TV. There is no distortion (stretching) of the image in any direction.
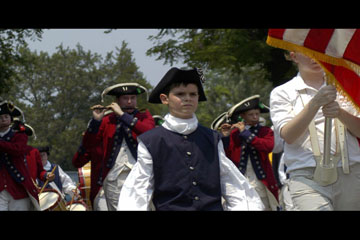
Now lets place that into a Premiere 6.5 project set to DV Widescreen to get image (b). This is what we mean by anamorphic video. Notice how everything is stretched top to bottom (tall).

|
| Image (b) - 16:9 DV Widescreen (Anamorphic) image. This is how an anamorphic video would look when played on a device that does not correct for pixel aspect, such as your computer using Windows Media Player. Note that if the file is properly tagged as 16:9 DV Widescreen (Anamorphic) pixel aspect, then Premiere 6.5 will actually correct it when you preview it in Premiere. The preview is strictly for display and does not change the file. |
If we wanted a 16:9 image to be displayed on a 4:3 TV, we can either crop (see image (e) below) it or add a matte around the image to make it fit a 4:3 TV. This a Letterbox image (c) as it would be displayed on a standard TV.

|
| Image (c) - 16:9 Letterbox display image. This is how a 16:9 letterbox image should look on a standard 4:3 TV. The black matte (bars on the top and bottom) let the 16:9 image fit inside a 4:3 TV without and distortion or cropping of the original. |
|
| Image (d) - 16:9 Letterbox DV image. This is how letterboxed 16:9 video would look when played on a device that does not correct for pixel aspect, such as your computer using Windows Media Player. Note that if the file is properly tagged as 4:3 Standard DV pixel aspect, then Premiere 6.5 will actually correct it when you preview it in Premiere. The preview is strictly for display and does not change the file. The preview would look like image (c). |
Moving on to standard 4:3 content. Image (e) is what we would see if we had just a plain old 4:3 image displayed on a 4:3 TV. Notice that we loose some of the content (left and right). This cropping is what is refered to as pan-and-scan. For movies to be formated for your TV, the director (hopefully) decides what is most important to the video and that is the part you see.

|
| Image (e) - 4:3 Standard display. |
The DV NTSC format is 720x480 pixels. This is not 4:3 in size. This is what they say the pixels are not square, the are rectangular (taller than wide). the 720x480 pixel video file is used for both DV Widescreen and DV Standard. For DV Widescreen, the pixels are also rectangular, but wider than tall. For image (f), notice how the image looks stretched left to right. Treating the pixels as square causes this. When the video is played on a 4:3 TV, you can think of the pixels as being sqeezed left to right so that the video fits into TV display.

|
| Image (f) - 4:3 Standard DV image. This is how standard 4:3 video would look when played on a device that does not correct for pixel aspect, such as your computer using Windows Media Player. Note that if the file is properly tagged as 4:3 Standard DV pixel aspect, then Premiere 6.5 will actually correct it when you preview it in Premiere. The preview is strictly for display and does not change the file. The preview would look like image (e). |
Now for something fun! Let put a 4:3 image onto a 16:9 display. Just like the reverse (16:9 on a 4:3 display above) you either have to crop the image (cutting off the top and bottom) or matte the image on the left and right. Matting the image in this way is usually refered to as "Windowbox" video.
|
| Image (g) - 4:3 Standard DV image in a 16:9 display. |
Now what would the raw DV Widescreen (Anamorphic) video of image (g) look like if it was not correct for PAR? We would see image (h).

|
| Image (h) - 4:3 Standard DV image in a 16:9 DV Widescreen video. |
Notice how images (g) and (h) compare to the first two images (a) and (b). The 4:3 version have the left and right sides cut off.
Ok, now for a few special cases. These will only be presented in a display example and the stretching will be similar to above. When an image is letterboxed or windowboxed, you are creating a new video. Letterbox video (a 16:9 image on a 4:3 display) is longer purely widescreen. It becomes standard video with black at the top and bottom. The same holds for windowbox video (a 4:3 image on a 16:9 display). If you take these letterbox and window box formats and bring them into a project of their original format (letterbox into a 16:9 display and windowbox into a 4:3 display), you get the following two images (i) and (j). Basically a matte all the way around the original image.

|
| Image (i) - A 16:9 image was letterbox into a 4:3 video which was then put into a 16:9 widescreen video. |

|
| Image (j) - A 4:3 image was windowboxed into a 16:9 video which was then put into a 4:3 standard video. |
There are a few issues that I have not covered. The biggest is the problem of interlacing. When you are changing pixel aspect ratios, anything that changes the height of the original image has the potential of severe interlacing problems. This is because when you make the height shorter, you are getting rid of lines of video. This make some interlaced lines display out of order. There are probably some very complex things you can to to fix this, but the easy thing to do is test your video and apply deinterlacing to the clips that have the problem. You will see this the most when going from a 16:9 image to a letterbox 4:3 video.
Hopefully you can use this information as a visual reference when you have a question about your own video. If you have any more questions, please contact me at jeremy@jeremymoore.com